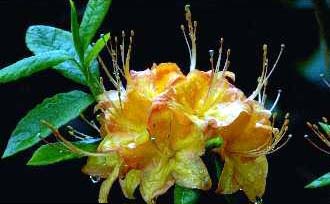
Fiery tulips saluting an April sky; a lavender crocus peeping through almost melted snow – few garden sights can equal the joys of bulbs in bloom. Best of all, bulbs can thrive in most climates with minimal care.
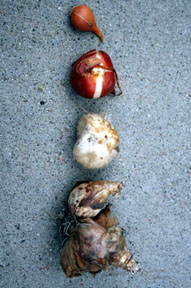
The group of plants known as "bulbs" is remarkable for its adaptation to difficult environments. Bulbs have developed a protective storage organ which contains the entire plant in embryonic form. The outer layers of this organ are tough and dry, while the inner layers stay moist to nourish the plant through its period of new growth.
Actually, many plants in this group are not true bulbs. Tubers, corms, and rhizomes are shaped a little differently and reproduce in a variety of forms, but all those which have a similar storage organ are cared for in much the same way.
Tender or Hardy?
All bulbs can be divided into two categories: tender and hardy. Tender bulbs, such as gladioluses, dahlias, and tuberous begonias, cannot stand freezing temperatures and must be dug up before the winter (except in temperate climates) or planted in greenhouses or indoor containers. Hardy bulbs, such as most tulips and lilies, are just the opposite. They require cold temperatures during the dormant period and should be left in the ground in colder climates, but dug up and given a cooling treatment in temperate zones. It is important to know whether your selections are of the tender or hardy varieties when planting your bulbs.
Choosing the Location
Most bulbs like rich, well-drained soil with warm sunlight and a protective mulch. Choose a location away from high winds and cold down-drafts. Planting in window boxes or beside a southern-facing wall or fence provides protection, warmth, and a great showcase for the flowers.
If the area you wish to plant is not hospitable to bulbs, consider planting in containers so that they may be displayed during their big show but protected in a better place later.
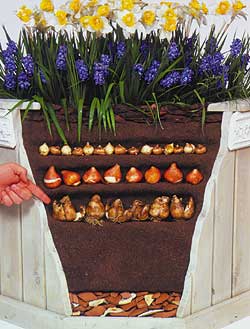
Many gardeners like to plan their garden for color and continuous blooming throughout the year. Your nursery or bulb catalogue can tell you the blooming cycles of each variety. In general, large blooms are better for planting in beds and borders. Smaller flowers do well as under-plantings and in wooded or rock gardens.
Soil Preparation
Drainage is the most important factor in successful soil preparation for your bulbs. To test whether or not the area you have selected drains well, take a handful of moist soil and clench it in your fist. If you can squeeze out water, the soil is too wet; if the soil retains the shape of your fist, you have too much clay.
Both conditions may be improved by adding organic matter to your soil. Spread a 2- or 3-inch layer of compost, humus or peat moss into your planting area and work in well. This allows the soil to drain, yet stay moist enough to nourish the bulbs. For real problem areas, include drain pipes or plant in raised beds.
Planting
It is crucial to plant bulbs at the correct depth for each variety. A good rule is to dig a hole three times as deep as the bulbs' greatest diameter. When planting in rows or beds, it is easiest to dig a trench at the correct depth. However, for a more natural clump effect you will need to dig holes with enough space to plant at least 3 bulbs in each.
The roots of bulb plants must have phosphorus to establish themselves. This can be supplied by using bone meal or super-phosphate fertilizer at the deepest level of the hole. Cover the fertilizer with a thin layer of soil and be sure to set the bulbs in an upright position. Then fill in with soil and firm lightly with your hands.
Water thoroughly after planting. This will probably be enough to carry fall-planted bulbs through all but the driest winters. Bulbs mildew easily and usually will not need more water until they are well sprouted. Then water regularly until the blooms have faded and foliage has died back.
Propagation
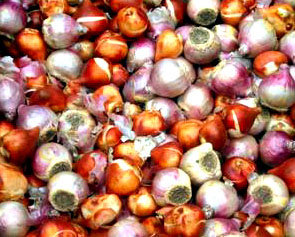
One of the advantages of bulbs is that they are easy to propagate. Most bulbs and corms produce small offsets which can be separated off from the mother plant and planted as is. Rhizomes, tubers, and tuberous roots can be cut in sections containing a bud eye.
Bulbs can also be propagated by seed. They should be covered with only a thin film of soil and kept damp until they germinate, then planted in pots when large enough to handle. Be careful not to overwater.
TIPS: MULCHING IS IMPORTANT
A heavy mulch of chopped leaves, straw, or other organic compounds will help regulate the ground temperature and aid in moisture retention. Tender varieties need protection from freezing temperatures and prolonged summer droughts. A good mulch will also help to keep weeds down.
IMPORTANT
Continue watering after blooms have faded and while foliage is yellowing. Allow foliage to die back completely before cutting off or digging up bulbs for the winter. The dying leaves provide nutrients the bulbs need to manufacture the next season’s flowers.
STEPS FOR SUCCESSFUL PLANTING OF BULBS
1. Dig up the bed to loosen soil and achieve the correct planting depth.
2. Add organic amendments to aid in drainage and apply a thin layer of bone meal.
3. Set bulbs in an upright position at the desired spacing for each variety.
4. Carefully fill in around bulbs with topsoil and tamp down gently.
5. Water thoroughly just after planting, and sparingly during the growth cycle.
6. Cover area with a thick layer of mulch to retain moisture and to protect from heat or cold.